Monday, November 21, 2011

An implementation of Finite State Machine in Android using Handler...

Note: If you want to know about a full-fledged application about how a long running task in a background service has been broken into small states please have a look at this article.

As i was doing some research on different concepts in Android, i came out with this implementation of Finite State Machine using the Handler class... i would like to share it with you... the state diagram of the application will look as the following:


The main Activity class looks like the following:

package com.android.training.statepattern;

import android.app.Activity;
import android.os.Bundle;
import android.view.View;
import android.widget.Button;


public class StatePatternActivity extends Activity implements View.OnClickListener{
 private Button startStatePattern;
 private MyHandler handler;
    /** Called when the activity is first created. */
    @Override
    public void onCreate(Bundle savedInstanceState) {
        super.onCreate(savedInstanceState);
        setContentView(R.layout.main);
        
        startStatePattern = (Button)findViewById(R.id.button1);
        
        startStatePattern.setOnClickListener(this);
        handler = new MyHandler(this);
    }
    
    public void onClick(View v){
     if(v.equals(startStatePattern)){
      handler.sendEmptyMessage(1);
      }
    }  
}

And the other class is as follows;
package com.android.training.statepattern;

import android.os.Handler;
import android.os.Message;
import android.widget.Toast;

public class MyHandler extends Handler {
 private StatePatternActivity MainActivity;
 
 MyHandler(StatePatternActivity a){
  this.MainActivity = a;
 }
 //state transition logic is strongly coupled with the different states...
  public void handleMessage(Message msg){
   switch(msg.what){
   case 1:
    ////do the processing
    Toast.makeText(MainActivity.getApplicationContext(),"Inside State 1", 2000).show();
    this.sendEmptyMessage(2);
    break; 
   case 2:
    ///do the processing
    Toast.makeText(MainActivity.getApplicationContext(),"Inside State 2", 2000).show();
    this.sendEmptyMessage(3);
    break;    case 3:
    ///do the processing
    Toast.makeText(MainActivity.getApplicationContext(),"Inside State 3", 2000).show();
    this.sendEmptyMessage(4);
    break;
   case 4:
    break;
  default:
   break;   
   }
  } 
}

Let me explain the code a bit... here the crux of the solution lies in the MyHandler class derived from Handler.. The main activity class HAS MyHandler..
We start the State machine by sending a message (integer 1) through the function SendEmptyMessage called on MyHandler object. As a result, the callback function called handleMessage of the Handler is called and we handle this state's functionality here... the next all starte transitions happen sequentially from this callback function...
Hope this throws some lights on a specific design concept in Android...

Thursday, November 17, 2011

Robotium - automated unit test tool for Android...

the following text explains how to use Robotium in Eclipse.. Robotium is an automated unit testing tool for Android...
for this we need to download the Robotium.jar file from here...
setting up the environment is easy...

  • put the above jar in the build path’s library section...
  • add the following lines of code in the manifest.xml file in the manifest section (i.e. outside the app section)...
(instrumentation android:name="android.test.InstrumentationTestRunner"
   android:targetPackage="training.android.trainingunitconverter"
   android:label="1" /)

the below snippet of code is to test the UnitConverter app...

  • create a file(say UnitConverterTest.java) and add the following piece of code...

package training.android.trainingunitconverter;

import java.util.ArrayList;
import android.test.ActivityInstrumentationTestCase2;
import android.test.suitebuilder.annotation.Smoke;
import android.widget.EditText;
import android.widget.Spinner;
import com.jayway.android.robotium.solo.Solo;

public class UnitConverterTest extends ActivityInstrumentationTestCase2{
private Solo solo;
public UnitConverterTest() {
super("training.android.trainingunitconverter", UnitConverter.class);
}
public void setUp() throws Exception {
solo = new Solo(getInstrumentation(), getActivity());
}
@Smoke
public void testUnitDropDown() throws Exception {

solo.assertCurrentActivity("Expected UnitConverter activity", "UnitConverter");
solo.pressSpinnerItem(0, 1);
solo.sleep(2000);
EditText value = (EditText)solo.getView(R.id.EditTextValue);
solo.enterText(value, "1");
solo.pressSpinnerItem(1,0);
solo.sleep(1000);
solo.pressSpinnerItem(2,1);
solo.sleep(1000);
solo.clickOnButton(0);
assertTrue(solo.searchText("1000.0"));
}
@Override
public void tearDown() throws Exception {
//Robotium will finish all the activities that have been opened
solo.finishOpenedActivities();
}
}

however, it seems that the solo.PressSpinnerItem() is not functioning properly on the emulator (either Android 2.2 or Android 1.6)... hopefully this issue will be fixed in the next release of Robotium...

to run it in the emulator, right click on the Project... go to Run As.. and press  Android JUnit Test...

the screen shot for the above test condition is 

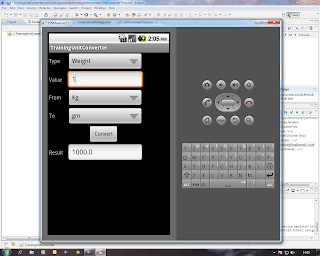
as from the test case
@Smoke
public void testUnitDropDown() it is clear, that we are first asking the test framework to select the item having index 1 (that is Weight) from the first spinner. then we are asking the framework to put a value 1 in the edittext. we are then asking the test framework to select item with 0th index (that is Kg) from the second spinner and item with index 1 (that is gm) from the third spinner... and we are asking the framework to press Convert button... so the expected result will be 1000.0... and we search in the test case if it has the value 1000.0. then the test case will PASS
similarly we can test different scenarios automatically by having more such functions as testUnitDropDown...


note:  the source code of the UnitConverter App with the Robotium test code can be cloned from https://github.com/sommukhopadhyay/UnitConverter/tree/f349925ffbd2cccb3a0bac37c4d7b428d92b354d

Git & GitHub

i think by now most of the people know about Git and Github. however, as i am still  not very much hands-on vis-a-vis contributing in the open source community, i think this piece of information will be useful to others...  
Git is an opensource version comtrol system developed by the same person who had created Linux. And using free version of Github, we can share our source code to the open source community. 
For this one will just have to open an account at www.github.com, create his own repository. However, to push your source code to this github repository, one has to install Git in the local machine. The latest version of eclipse comes with EGit plugin, which is of great help to push the project from the eclipse workspace.
i think its a good step towards contributing in the open source community...

here are the step by step screenshots of how one can push his project into the GitHub directly from the eclipse workspace...

                                                                           step1

                                                                            step 2


                                                                           step 3

                                                                         step 4


                                                                         step 5

                                                                            step 6
                                                                            step 7

                                                                          step 8

Thursday, November 10, 2011

Handling exception at construction in C++ using Boost's shared_ptr


Saturday, November 5, 2011

How to launch an Android App from the Browser

As i was doing some experimentation with android, i tried to launch a native app from a browser link... and i was successful... i would like to share whatever i have done with you..
The first thing one has to do to launch an app from a browser’s link is to add an additional intent filter in the app’s  Manifest file... for example to launch my native app (called UnitConverter) i have added the following few lines in the App’s manifest...

<intent-filter>
 <data android:scheme="unitconverter" />
 <action android:name="android.intent.action.VIEW" />
 <category android:name="android.intent.category.BROWSABLE" />
 <category android:name="android.intent.category.DEFAULT" />
</intent-filter>
  
and in the web app i have added html code as 


<a href="unitconverter://">Launch UnitConverter App</a>

and it has worked fine..

However, sometimes we may need to pass some query parameters in the html query tag like


<a href="unitconverter://?param1key=param1value&param2key=param2value">Launch 
UnitConverter App</a>

To catch these query parameters inside the Android app, i have written the following piece of code and added it in the onCreate function of the main Activity just after the line super.onCreate(savedInstanceState).


//to get the parameter passed from the URI that has launched this app
     final Intent intent = getIntent();
     String scheme = intent.getScheme();
     if(scheme != null){
             final Uri myURI=intent.getData();
             String queryString = new String();
                
             if(myURI!=null)
             {
               queryString = myURI.getQuery();
             }
             String split1 = "&";
             String split2 = "=";
             
             if (queryString != null)
             {
                 final String[] arrParameters = queryString.split("&");
                 for (final String tempParameterString : arrParameters)
                 {
                     final String[] arrTempParameter = tempParameterString.split("=");
                     if (arrTempParameter.length( )== 2)
                     {
                         final String parameterKey = arrTempParameter[0];
                         final String parameterValue = arrTempParameter[1];
                         //do something with the parameters
                         Toast.makeText(this, parameterValue, 500).show();
                     }
                 }
             }    
     }

And voila!!! it has worked perfectly...


Hope this discussion comes handy for the Android learners...